原生移动应用跨平台 E2E 测试指南
对于在持续集成和持续交付 (CICD) 上下文中遇到移动自动化测试难题的人来说,本文必读,尤其是在涉及 Android 和 iOS 的原生移动应用时。要找到涵盖此特定主题的足够资源非常具有挑战性。

在本文中,我将指导您完成一个详细的分步过程,说明如何在不花费任何成本的情况下创建全面的端到端测试管道,利用 GitHub Actions 同时用于 iOS 和 Android 平台。在整个教程中,我们将使用我们心爱的 WebdriverIO 框架。
挑战
我们的挑战是建立一个统一的管道工作流程,使我们能够在 iOS 和 Android 平台上测试我们的原生移动应用程序。在之前的文章中,我们深入探讨了使用模拟器和 GitHub Actions 为 Android 应用构建管道的过程。为了处理 Android 组件的 E2E 测试,我们将重用该工作流程。但是,我们仍然需要解决创建 iPhone/iPad 模拟器单独作业的更大挑战。
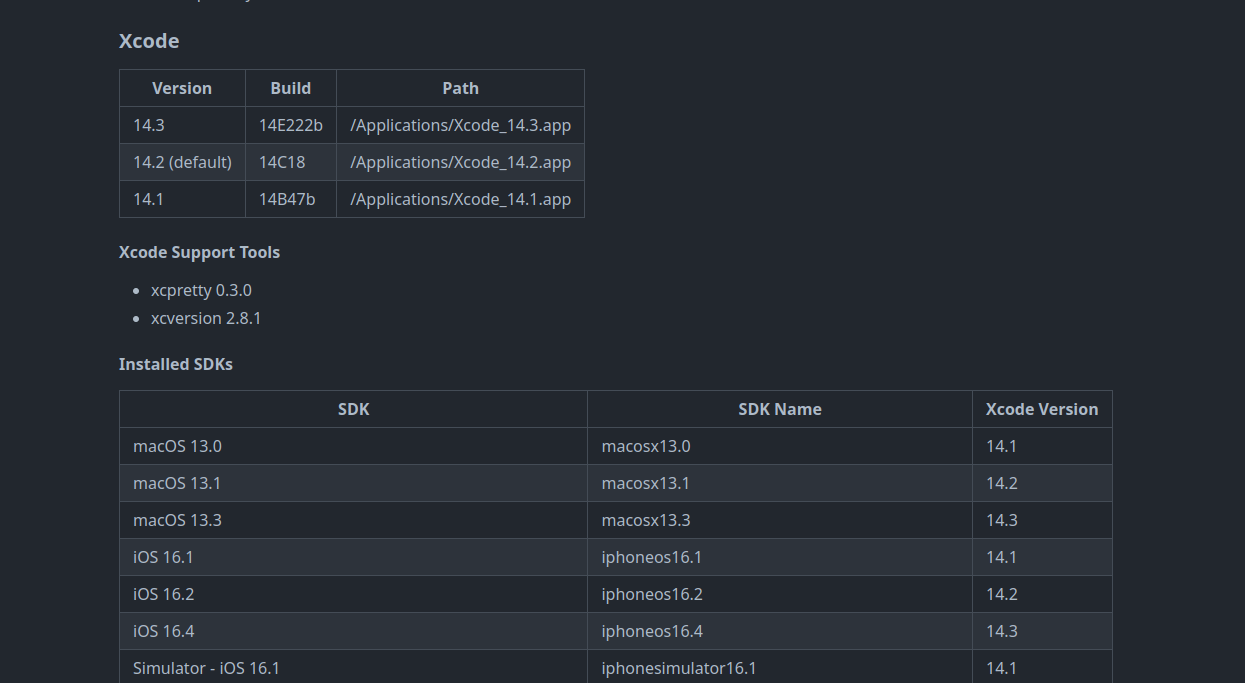
在我的研究过程中,我偶然发现了令人难以置信的有用但经常被忽视的功能,即 macOS GitHub 运行器预装了 Xcode,以及 iPhone iOS 模拟器所需的 SDK。这一认识在我的脑海中引发了一个想法:为什么不复制我们对 Android 模拟器所采用的过程,但这次针对 iOS 模拟器呢?这尤其令人兴奋,因为 GitHub Actions 的 iOS 运行器支持虚拟化,使其成为我们目的的可行选择。
此功能使我们能够在没有任何额外成本的情况下构建我们的管道(最多 2000 分钟)。
工作流程结构
我们的 GitHub Actions 工作流程在核心概念上基本上与 Android 相同,但有一些技术差异。
- 创建模拟器
- 安装依赖项
- 执行测试
- 生成报告
看起来很简单,但是怎么做呢?让我们看看。
步骤 1
如前所述,GH Actions 运行器包含一系列可用的模拟器。虽然我们可以利用这些现有模拟器之一,但这需要使用 deviceName 和其
每次执行时随机变化的 UUID。但是,您仍然可以使用 shell 命令提取相关的 UUID。
为了简化流程并提高灵活性,我们将创建自己的模拟器。由于 Xcode 已安装,因此我们可以使用“xcrun”CLI。要使用终端从已安装的 iOS 版本创建模拟器,只需执行以下命令
xcrun simctl create "iPhone 14 Pro" "com.apple.CoreSimulator.SimDeviceType.iPhone-14-Pro" "com.apple.CoreSimulator.SimRuntime.iOS-16-0"
执行此命令将立即创建模拟器并随后检索其 UUID。
为了增强可重用性和优化流程,我们可以将此命令封装在 shell 脚本中。通过一些修改,我们可以确保 UUID 作为环境变量存储在 GitHub Runner 中,我们最终将将其用于我们的测试功能。
#!/bin/bash

# Set iPhone model and iOS version
iphone_model="${IPHONE_MODEL// /-}"
ios_version="${IOS_VERSION//./-}"
simulator_name="${iphone_model}"
simulator_udid=$(xcrun simctl create "$IPHONE_MODEL" "com.apple.CoreSimulator.SimDeviceType.$iphone_model" "com.apple.CoreSimulator.SimRuntime.iOS-$ios_version")

# Export the simulator UDID as an environment variable
export SIMULATOR_UDID="$simulator_udid"
echo "SIMULATOR_UDID=$SIMULATOR_UDID" >> $GITHUB_ENV

# Boot the simulator
xcrun simctl boot "$simulator_udid"
通过使用上面的脚本,我们可以提供设备型号和 iOS 版本作为环境变量,这些变量可以存储在我们工作流程的环境部分中,这将创建模拟器并将 UUID 存储在 GITHUB_ENV 中。此 UUID 将对配置测试中所需的所需功能至关重要。
由于我们在 shell 脚本中使用 IPHONE_MODEL 和 IOS_VERSION 作为环境变量,因此我们必须在环境部分中设置它们,如下所示。
步骤 2
在上一步骤中成功创建并启动模拟器后,务必验证该过程是否已完成且没有任何问题,并且该设备已完全准备好使用。
![]()
为了确保测试的成功启动,必须确认 IOS 已完全启动。为此,我创建了一个代码片段,该片段会持续监控设备的状态,直到获得特定输出,表明模拟器的启动过程已完成。
#!/bin/zsh

function wait_for_boot() {
  printf "${G}==> ${BL}Waiting for the simulator to boot...${NC}\n"
  start_time=$(date +%s)
  spinner=( "⠹" "⠺" "⠼" "⠶" "⠦" "⠧" "⠇" "⠏" )
  i=0
  # Get the timeout value from the environment variable or use the default value of 60 seconds
  timeout=${BOOT_TIMEOUT:-60}

  while true; do
    output=$(xcrun simctl bootstatus "$SIMULATOR_UDID")
    echo "${output}"
    if [[ $output == *"Device already booted, nothing to do."* ]]; then
      printf "\e[K${G}==> \u2713 Simulator booted successfully${NC}\n"
      exit 0
    else
      printf "${YE}==> Please wait ${spinner[$i]} ${NC}\r"
      i=$(( (i+1) % 8 ))
    fi

    elapsed_time=$(( $(date +%s) - $start_time ))
    if [[ $elapsed_time -ge $timeout ]]; then
      printf "${RED}==> Timeout waiting for simulator to boot 🕛${NC}\n"
      exit 1
    fi

    sleep 1
  done
}

# Call the wait_for_boot function
wait_for_boot
步骤 3
接下来,我们将介绍执行测试所需的必要步骤和依赖项。这包括安装 Appium、XCUITest 驱动程序和必要的 Node.js 库。
  "devDependencies": {
    "@wdio/allure-reporter": "^8.10.4",
    "@wdio/appium-service": "^8.10.5",
    "@wdio/cli": "^8.10.5",
    "@wdio/local-runner": "^8.10.5",
    "@wdio/mocha-framework": "8.10.4",
    "@wdio/spec-reporter": "8.8.7",
    "ts-node": "^10.9.1",
    "typescript": "^5.0.4"
  },
  "dependencies": {
    "allure-commandline": "^2.22.1",
    "appium": "2.0.0-beta.71",
    "appium-uiautomator2-driver": "*",
    "appium-xcuitest-driver": "*"
  }
连接拼图
既然现在已经准备好执行 iOS 模拟器上的移动自动化测试所需的环境的关键要素,让我们将它们全部包装到 GH Actions 的单个 yaml 文件中。
name: Wdio-x-native

on:
  workflow_dispatch:

env:
  IPHONE_MODEL: iPhone 8
  IOS_VERSION: 16.2
  BOOT_TIMEOUT: 700

jobs:
  ios:
    runs-on: macos-13

    steps:
      - uses: actions/checkout@v3

      - name: Export environment variables
        run: |
          export IPHONE_MODEL=$IPHONE_MODEL
          export IOS_VERSION=$IOS_VERSION

      - name: Start simulator
        run: |
          chmod a+x ./sscript/start_simu.sh
          ./sscript/start_simu.sh

      - name: Install dependencies
        run: |
          npm i

      - name: Check simulator booting status
        run: |
          chmod a+x ./check_simu.sh
          ./check_simu.sh

      - name: Execute the test
        run: |
          npm run ios
可以将模拟器状态检查和模拟器启动合并到单个 shell 脚本中。但是,我故意将它们分开以单独执行它们。这使我能够利用模拟器启动并安装其余依赖项所需的时间。之后,我就可以继续检查模拟器状态。类似地,我们将对 Android 模拟器应用相同的方法(查看上一篇文章)。
构建跨平台工作流程
现在是时候将我们之前文章中的 Android 工作流程与 Ios 工作流程合并到一个工作流程中,使用矩阵策略如下。
name: Wdio-x-native

on:
  workflow_dispatch:

env:
  IPHONE_MODEL: iPhone 8
  IOS_VERSION: 16.2
  API_LEVEL: 32
  EMULATOR_NAME: Nexus
  EMULATOR_DEVICE: Nexus 5
  EMULATOR_VERSION: 12
  ANDROID_ARCH: x86_64
  ANDROID_TARGET: google_apis
  ANDROID_BUILD_TOOLS_VERSION: 34.0.0-rc4
  ANDROID_SDK_PACKAGES: system-images;android-32;google_apis;x86_64 platforms;android-32 build-tools;34.0.0-rc4 platform-tools emulator
  EMULATOR_TIMEOUT: 350
  BOOT_TIMEOUT: 700

jobs:
  ios:
    runs-on:
       - macos-13
    strategy:
      matrix:
        os: [IOS]
        device: [$IPHONE_MODEL]
        version: [$IOS_VERSION]
    steps:
      - uses: actions/checkout@v3

      - name: Export environment variables
        run: |
          export IPHONE_MODEL=$IPHONE_MODEL
          export IOS_VERSION=$IOS_VERSION
    # ...
    # find the full workflow at the end of the article
    # ...

  android:
    runs-on: macos-13
    strategy:
      matrix:
        os: [Android]
        emulator_name: [$EMULATOR_NAME]
    steps:
      - uses: actions/checkout@v3

      - name: Add avdmanager and sdkmanager to system PATH
        run: |
          echo "$ANDROID_HOME/cmdline-tools/latest/bin:$ANDROID_HOME/emulator:$ANDROID_HOME/tools:$ANDROID_HOME/platform-tools:$ANDROID_HOME/build-tools/${{ env.ANDROID_BUILD_TOOLS_VERSION }}" >> $GITHUB_PATH

      - name: Install Sdk
        run: |
          yes Y | sdkmanager --licenses
          sdkmanager --install ${ANDROID_SDK_PACKAGES}

      - name: Build emulator

    # ...
    # find the full workflow at the end of the article
    # ...
在上面的示例中,我们将前面提到的 IOS 工作流程与我们之前文章中描述的 Android 模拟器工作流程集成在一起。
这些是您可能需要为 Android 模拟器和 iPhone 模拟器进行的推荐配置。需要注意的是,deviceName、platformVersion 和 UUID 在我们的对象中没有硬编码。这种灵活性使我们能够根据需要轻松地在不同版本和设备型号之间切换。
const emulator = [{
  platformName: 'android',
  'appium:options': {
    deviceName: process.env.CI ? process.env.EMULATOR_NAME : 'Nexus',
    platformVersion: process.env.CI ? process.env.EMULATOR_VERSION : '13',
    automationName: 'uiautomator2',
    appPackage: 'com.wdiodemoapp',
    appWaitPackage: 'com.wdiodemoapp',
    appActivity: 'com.wdiodemoapp.MainActivity',
    appWaitActivity: 'com.wdiodemoapp.MainActivity',
    uiautomator2ServerLaunchTimeout: 200000,
    uiautomator2ServerInstallTimeout: 200000,
    appWaitForLaunch: true,
    autoGrantPermissions: true,
    adbExecTimeout: 200000,
    androidInstallTimeout: 150000,
    ignoreHiddenApiPolicyError: true,
    noReset: true,
    fullReset: false
  }
}]

const simulator = [{
  platformName: 'iOS',
  'appium:options': {
    deviceName: process.env.CI ? process.env.IPHONE_MODEL : 'Iphone-13',
    platformVersion: process.env.CI ? process.env.IOS_VERSION : '15.5',
    automationName: 'XCUITest',
    bundleId: 'org.wdioNativeDemoApp',
    app: 'iOS-Simulator-NativeDemoApp-0.4.0.app.zip',
    udid: process.env.CI ? process.env.SIMULATOR_UDID : '15A098DB-B8A0-4D6A-9057-23FF1F0F0D9B',
    useNewWDA: true,
    usePrebuiltWDA: false,
    wdaConnectionTimeout: 180000,
    appWaitForLaunch: true,
    noReset: true,
    fullReset: false
  }
}]
初始执行
好消息是工作流程配置正确,并且 IOS 应用的 e2e 测试已成功执行。
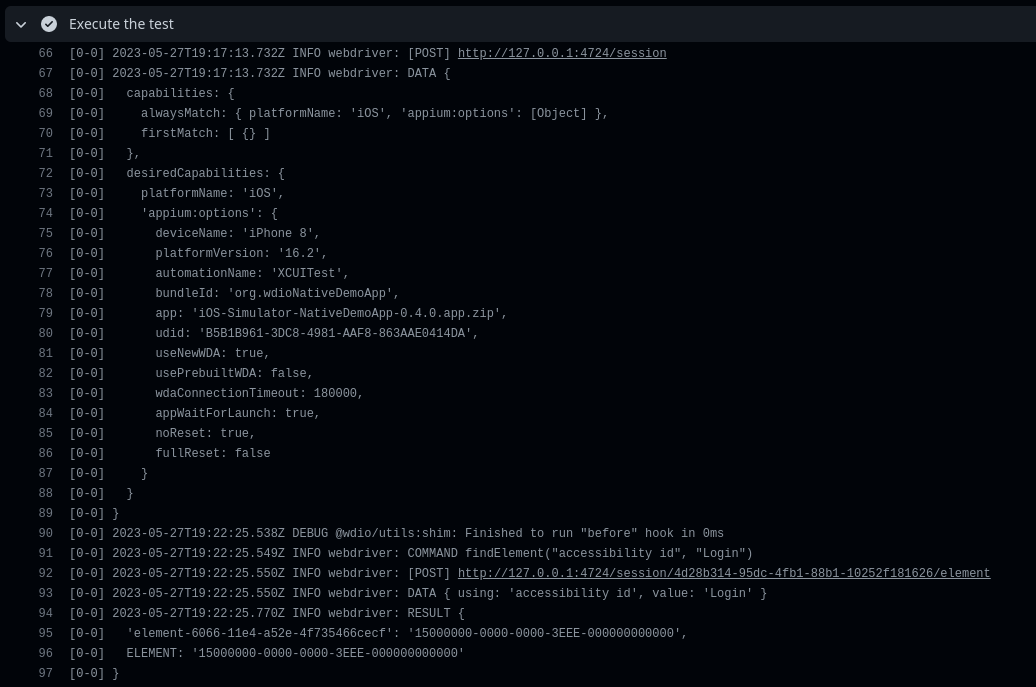
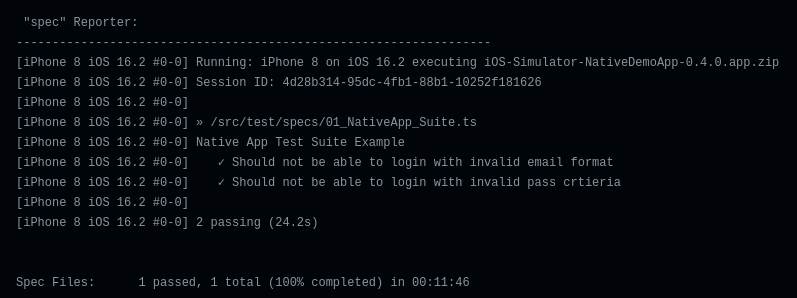
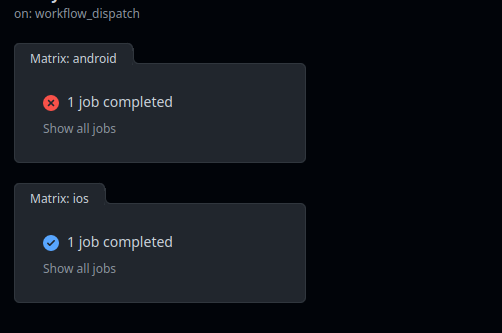
尽管 iPhone 模拟器的端到端测试已通过,但观察到 Android 模拟器的测试显示出不稳定性。
调试
系统 UI 崩溃
似乎在无头模式下第一次运行 Android 偶尔会导致随机的系统 UI 无响应问题。不幸的是,此问题阻止我们执行测试,因为 UI 系统无响应,这导致 Appium 无法与应用正确交互。
在查看 allure 报告屏幕截图时确认了该问题。
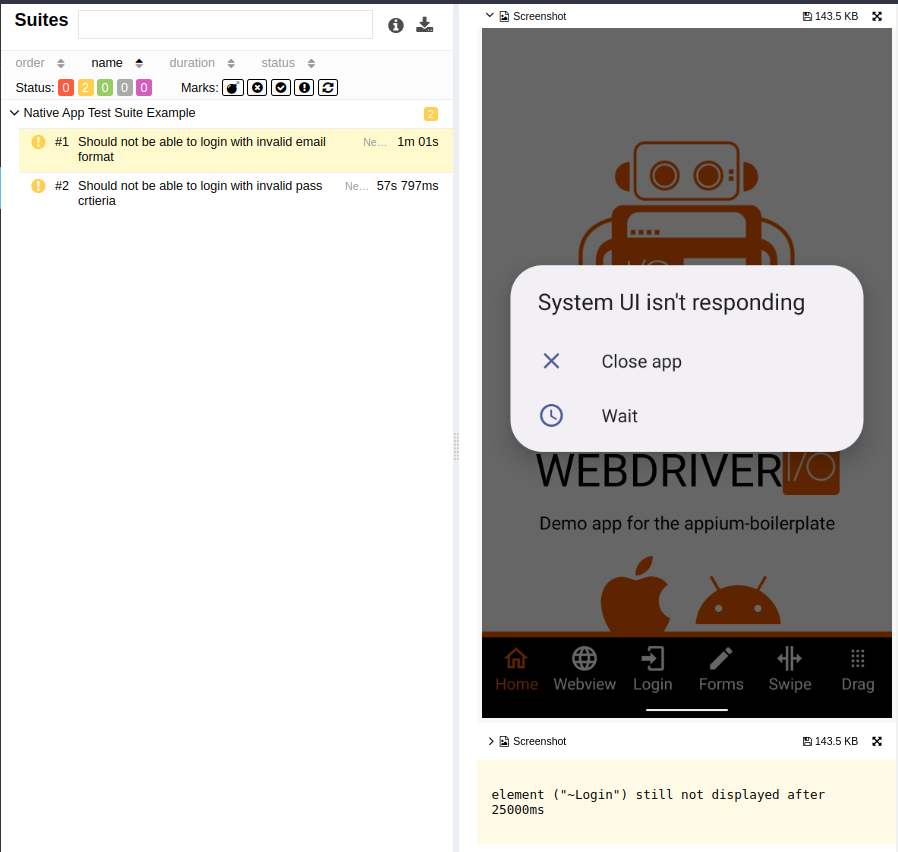
这解释了为什么终端日志显示 Appium 无法找到任何元素,尽管应用已成功启动。
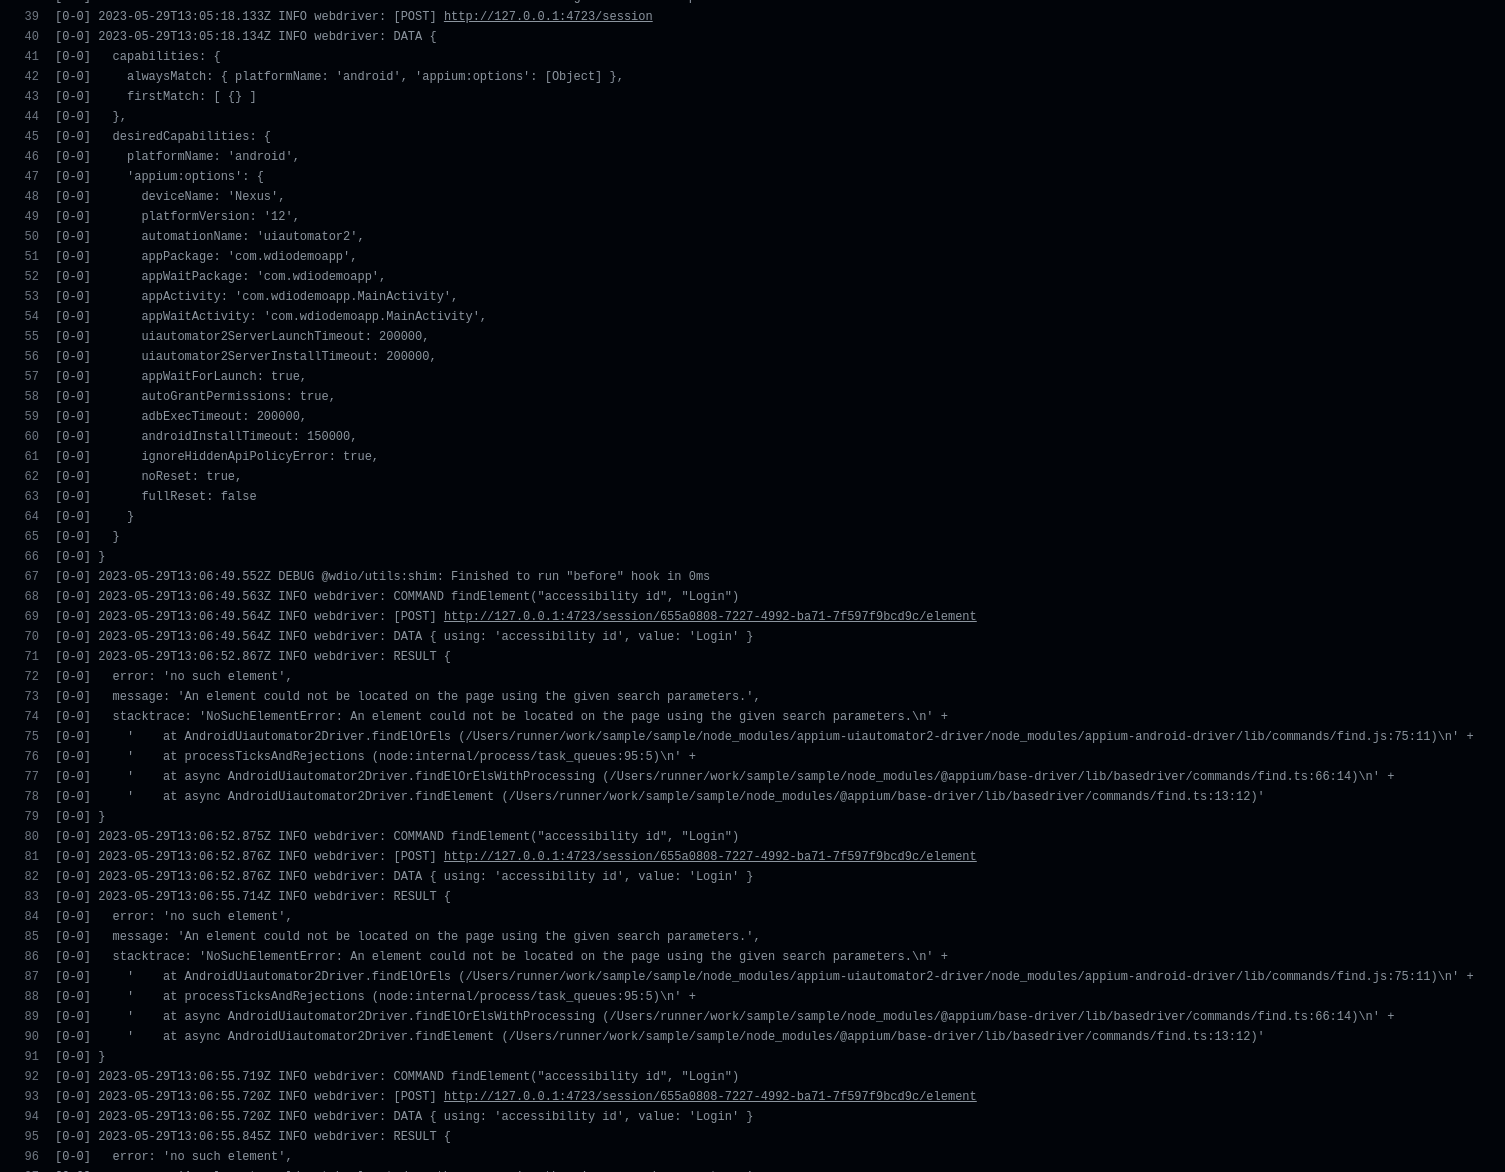
这是有道理的,因为 Appium 试图在当前运行的活动(即 .systemui)上查找所需的元素,即使我们的目标应用已在后台启动。
连接超时
已经注意到,在某些情况下,Appium 在启动测试时遇到故障,所有连接重试尝试均未成功。但是,经过彻底调查,发现通过应用:“./test.apk”功能将 Apk 文件安装到 Android 模拟器需要异常长的时间,需要显着延长连接超时以确保成功安装,这不是最佳解决方案。
现在我们已经确定了问题及其根本原因,是时候解决并解决它们了。
解决
系统 UI 崩溃
幸运的是,我们可以利用能够抓取 Android 设备上当前正在运行的 Activity 的优势。这个权限允许我们检测系统 UI 或任何类似的 Android 服务是否会崩溃或正常运行。我们可以通过执行以下 adb shell 命令来实现这一点
adb shell dumpsys window 2>/dev/null | grep -i mCurrentFocus


在我们正在进行的实现中,我们可以模拟在 Android 设备上遇到此问题时的自然行为。具体来说,我们将持续点击 Home 按钮,直到问题解决。一旦问题解决并且 Android 系统正常运行,我们预计会观察到“.NexusLauncherActivity”作为当前正在运行的主 Activity(其中“Nexus”代表 Android 设备)。
为了实现这一点,我开发了以下 shell 脚本
#!/bin/bash

function check_current_focus() {
  printf "==> Checking emulator running activity \n"
  start_time=$(date +%s)
  i=0
  timeout=20
  target="com.google.android.apps.nexuslauncher.NexusLauncherActivity"

  while true; do
    result=$(adb shell dumpsys window 2>/dev/null | grep -i mCurrentFocus)

    if [[ $result == *"$target"* ]]; then
      printf "==>  Activity is okay: \n"
      printf "$result\n"
      break
    else
      adb shell input keyevent KEYCODE_HOME
      printf "==> Menu button is pressed \n"
      i=$(( (i+1) % 8 ))
    fi

    current_time=$(date +%s)
    elapsed_time=$((current_time - start_time))
    if [ $elapsed_time -gt $timeout ]; then
      printf "==> Timeout after ${timeout} seconds elapsed 🕛.. \n"
      return 1
    fi
    sleep 4
  done
}

check_current_focus
上面显示的函数将持续循环,如果找不到主 Activity(NexusLauncherActivity),它将发送一个 Home 按钮事件并重复此过程,直到找到或达到超时时间。
连接超时
与其大幅延长 Appium 连接超时时间,我将在单独的步骤中处理 APK 安装以及主 Activity 检查。
      - name: Install APK
        run: |
          adb install Android-NativeDemoApp-0.4.0.apk
          chmod a+x ./mainActivityCheck.sh
          ./mainActivityCheck.sh

太好了!我们的解决方案已成功执行,并正确安装了 APK。正如预期的那样,系统 UI 没有响应,并且 shell 脚本有效地管理和处理了这种情况。
优化和增强工作流
我改进了工作流调度,以便更好地控制可以在其上执行测试的平台,无论是 iOS、Android 还是跨平台。
name: Wdio-x-native

on:
  workflow_dispatch:
    inputs:
      e2e:
         type: choice
         description: Select a platform
         required: true
         options:
            - xplatform
            - ios
            - android
         default: xplatform
因此,我们的作业应该进行调整
name: Wdio-x-native

on:
  workflow_dispatch:
    inputs:
      e2e:
         type: choice
         description: Select a platform
         required: true
         options:
            - xplatform
            - ios
            - android
         default: xplatform


permissions:
  contents: write
  pages: write
  id-token: write

env:
  IPHONE_MODEL: iPhone 8
  IOS_VERSION: 16.2
  API_LEVEL: 32
  EMULATOR_NAME: Nexus
  EMULATOR_DEVICE: Nexus 5
  EMULATOR_VERSION: 12
  ANDROID_ARCH: x86_64
  ANDROID_TARGET: google_apis
  ANDROID_BUILD_TOOLS_VERSION: 34.0.0-rc4
  ANDROID_SDK_PACKAGES: system-images;android-32;google_apis;x86_64 platforms;android-32 build-tools;34.0.0-rc4 platform-tools emulator
  EMULATOR_TIMEOUT: 350
  BOOT_TIMEOUT: 700

jobs:
  ios:
    runs-on:
       - macos-13
    if: ${{ contains(github.event.inputs.e2e, 'ios') || contains(github.event.inputs.e2e, 'xplatform') }}
    strategy:
      matrix:
        os: [IOS]
        device: [$IPHONE_MODEL]
        version: [$IOS_VERSION]
    steps:
      - uses: actions/checkout@v3
    # find the full workflow at the end of the article

  android:
    runs-on: macos-13
    if: ${{ contains(github.event.inputs.e2e, 'android') || contains(github.event.inputs.e2e, 'xplatform') }}
    strategy:
      matrix:
        os: [Android]
        emulator_name: [$EMULATOR_NAME]
    steps:
      - uses: actions/checkout@v3
    # find the full workflow at the end of the article
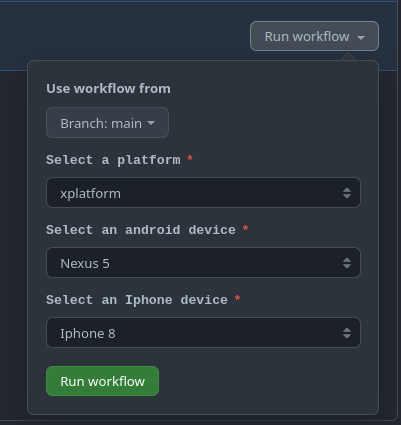
最后,生成我们的报告并将其部署到 GitHub 页面
      - name: Generate report
        if: always()
        run: |
          npx allure generate report/allure-results

      - name: Setup Pages
        if: always()
        uses: actions/configure-pages@v3

      - name: Upload artifact
        if: always()
        uses: actions/upload-pages-artifact@v1
        with:
          path: './allure-report'

      - name: Deploy to GitHub Pages
        if: always()
        id: deployment
        uses: actions/deploy-pages@v2
工作流执行
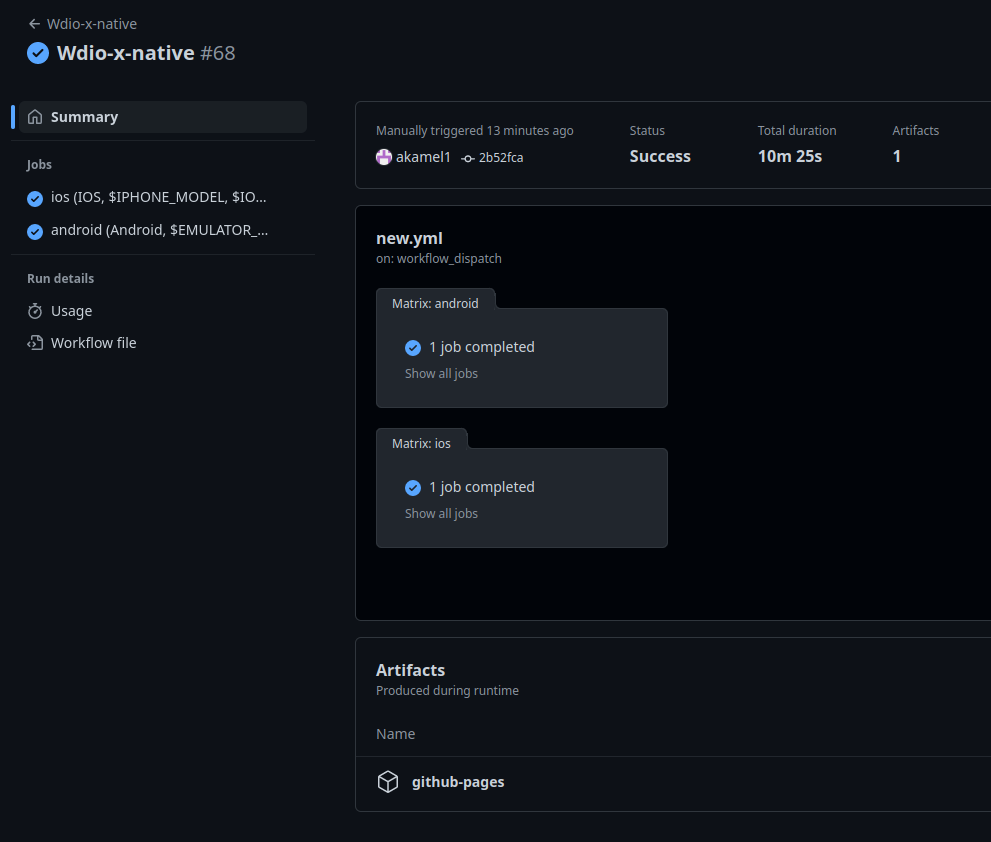
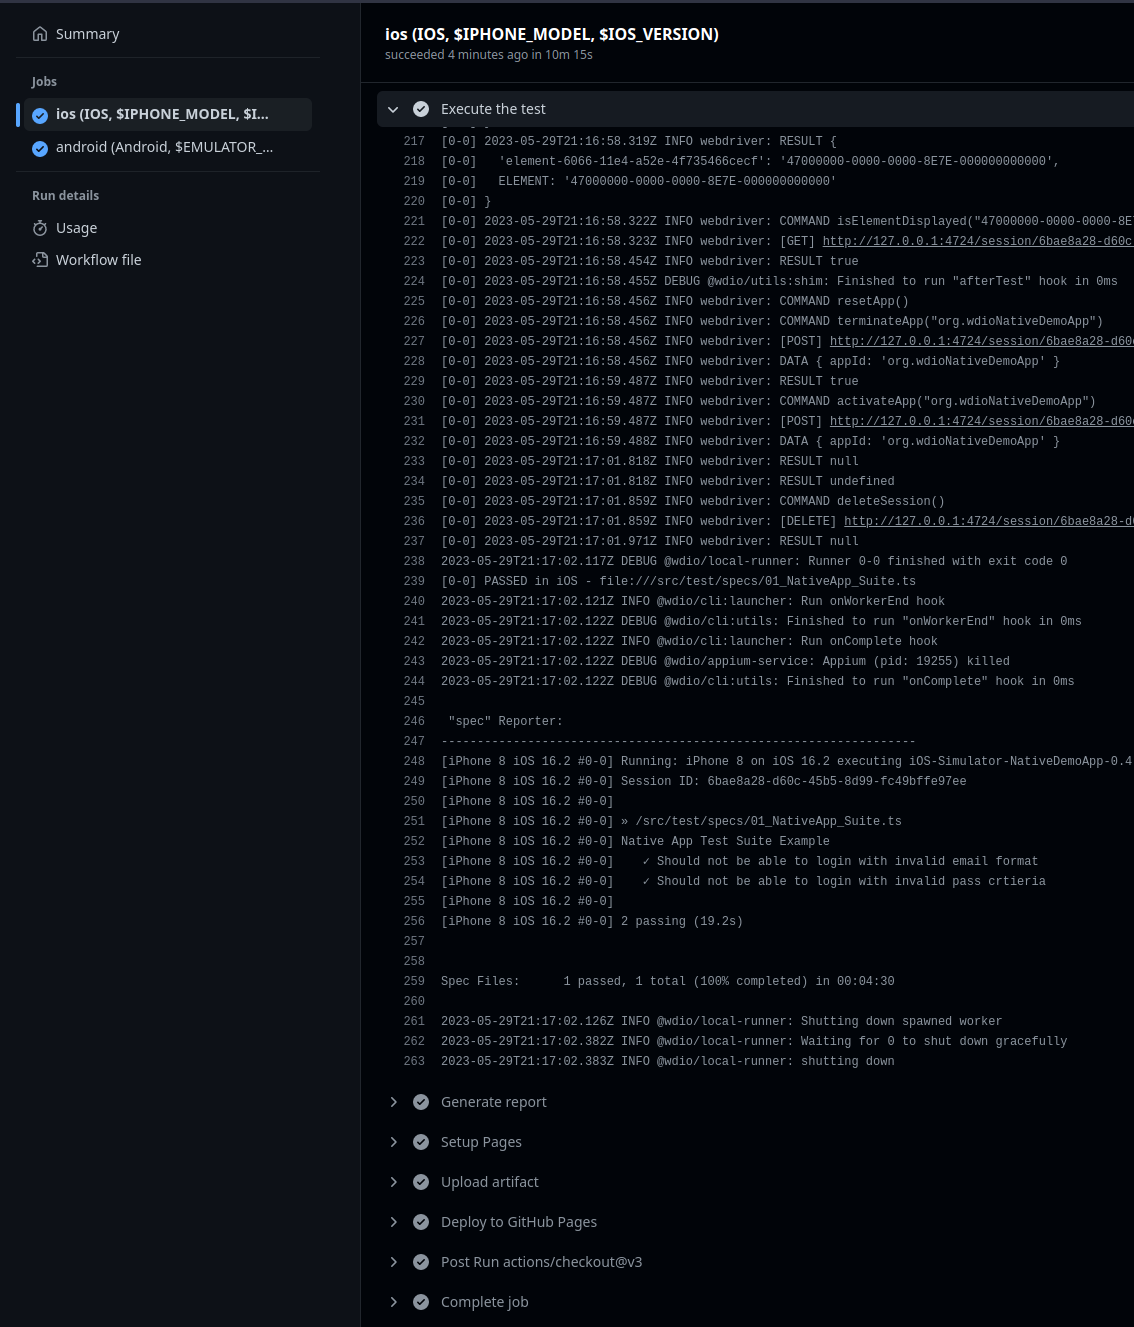
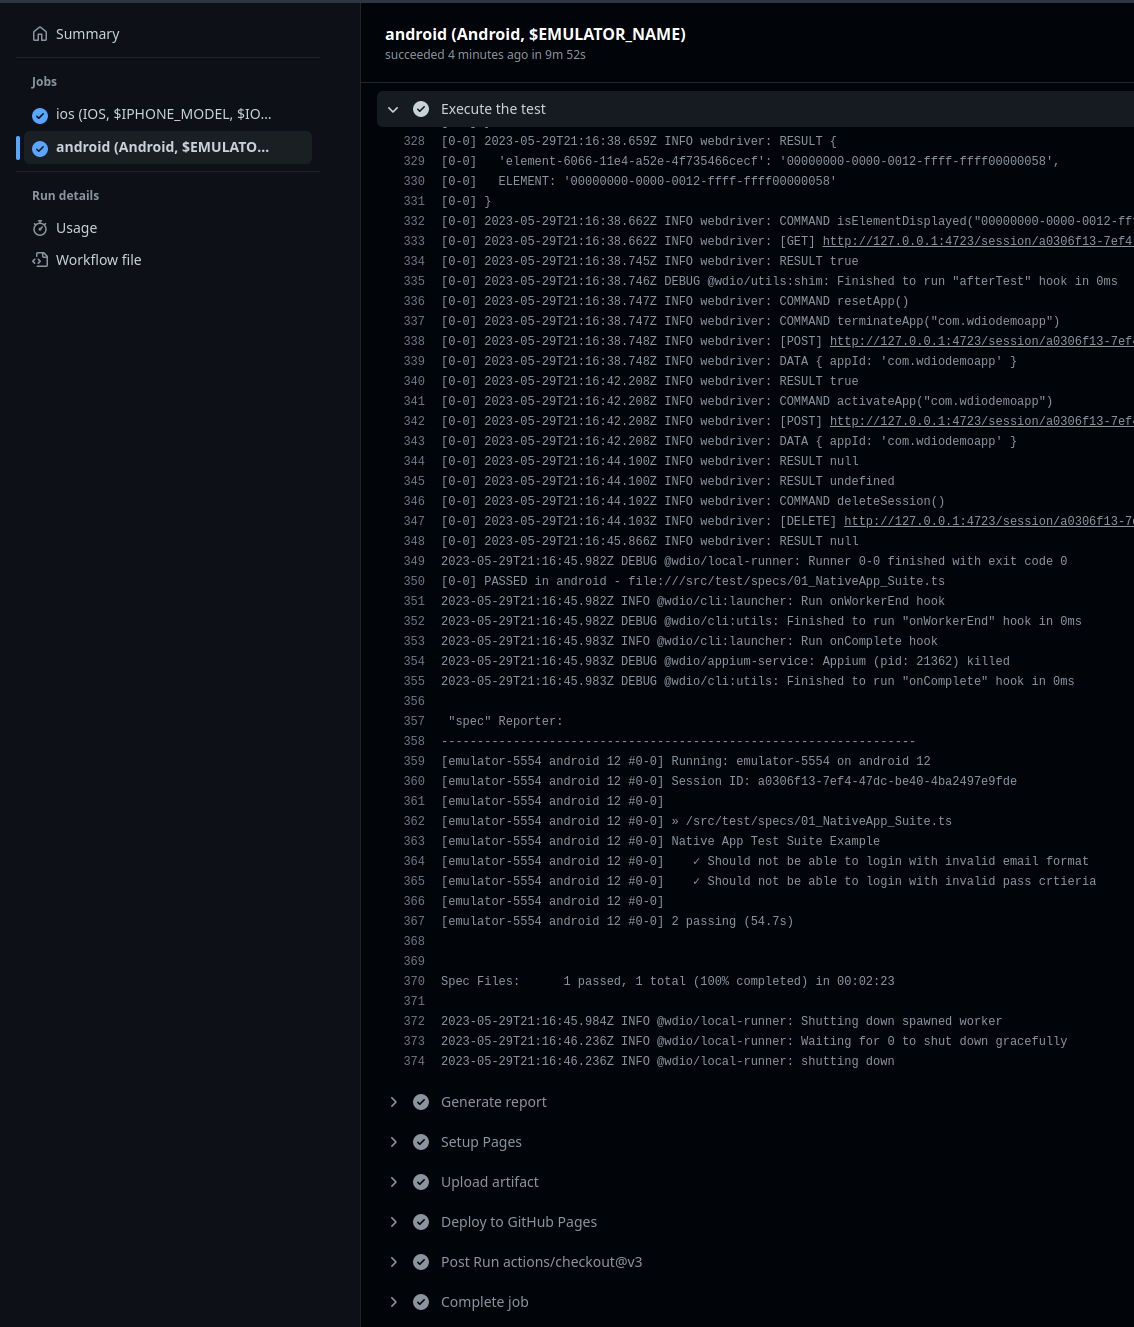
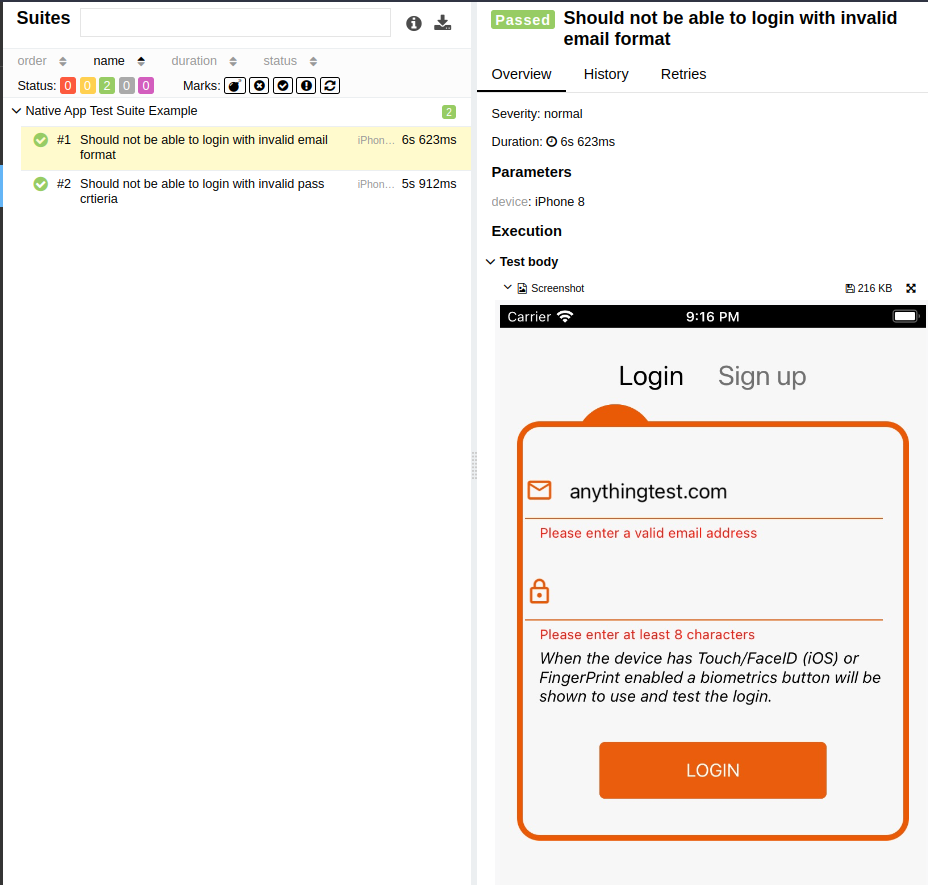
好消息!我们的工作流现在运行完美,并且表现出完全的稳定性。可以针对单个平台(例如 Android 或 iOS)或同时针对两个平台并行触发工作流。
loading...
结论
通过利用 GitHub Actions 提供的功能(为 Android 和 iOS 提供开箱即用的 SDK),我们获得了显著的优势。这使我们能够构建高效的端到端测试管道,而无需任何成本或依赖移动设备农场云服务。尽管在真实设备上进行测试更好,尤其是在 Android 上,但这种方法的免费性质提供了一个令人满意的折衷方案。
在我们的讨论中,我们逐步演示了如何使用 GitHub Actions 管道为原生移动应用构建跨平台端到端测试。我们解决了各种挑战、障碍和问题,确保了对流程的透彻理解。有了这些知识,您应该更容易构建满足您特定需求的自定义管道。
