Junit 报告器
一个 WebdriverIO 报告器,用于创建与Jenkins 兼容的基于 XML 的 JUnit 报告
安装
最简单的方法是将 @wdio/junit-reporter 作为开发依赖项保存在您的 package.json 中,通过
npm install @wdio/junit-reporter --save-dev
有关如何安装 WebdriverIO 的说明,请参见此处。
输出
此报告器将为每个运行器输出一个报告,因此您将为每个规范文件获得一个 xml 报告。以下是根据规范文件中的不同场景给出的 XML 输出示例。
单个 describe 块
describe('a test suite', () => {
    it('a test case', function () {
      // do something
      // assert something
    });
});
变成
<testsuites>
    <testsuite name="a test suite" timestamp="2019-04-18T13:45:21" time="11.735" tests="0" failures="0" errors="0" skipped="0">
        <properties>
          <property name="specId" value="0"/>
          <property name="suiteName" value="a test suite"/>
          <property name="capabilities" value="chrome"/>
          <property name="file" value=".\test\specs\asuite.spec.js"/>
        </properties>
        <testcase classname="chrome.a_test_case" name="a_test_suite_a_test_case" time="11.706"/>
    </testsuite>
</testsuites>
嵌套 describe 块
describe('a test suite', () => {
    describe('a nested test suite', function() {
        it('a test case', function () {
          // do something
          // assert something
        });
    });
});
变成
<testsuites>
    <testsuite name="a test suite" timestamp="2019-04-18T13:45:21" time="11.735" tests="0" failures="0" errors="0" skipped="0">
    <properties>
      <property name="specId" value="0"/>
      <property name="suiteName" value="a test suite"/>
      <property name="capabilities" value="chrome"/>
      <property name="file" value=".\test\specs\asuite.spec.js"/>
    </properties>
  </testsuite>
  <testsuite name="a nested test suite" timestamp="2019-04-18T13:45:21" time="11.735" tests="0" failures="0" errors="0" skipped="0">
    <properties>
      <property name="specId" value="0"/>
      <property name="suiteName" value="a nested test suite"/>
      <property name="capabilities" value="chrome"/>
      <property name="file" value=".\test\specs\asuite.spec.js"/>
    </properties>
    <testcase classname="chrome.a_test_case" name="a nested test suite a test case" time="11.706"/>
  </testsuite>
</testsuites>
多个 describe 块
describe('a test suite', () => {
    it('a test case', function () {
      // do something
      // assert something
    });
});
describe('a second test suite', () => {
    it('a second test case', function () {
      // do something
      // assert something
    });
});
变成
<testsuites>
    <testsuite name="a test suite" timestamp="2019-04-18T13:45:21" time="11.735" tests="0" failures="0" errors="0" skipped="0">
    <properties>
      <property name="specId" value="0"/>
      <property name="suiteName" value="a test suite"/>
      <property name="capabilities" value="chrome"/>
      <property name="file" value=".\test\specs\asuite.spec.js"/>
      <testcase classname="chrome.a_test_case" name="a nested test suite a test case" time="11.706"/>
    </properties>
  </testsuite>
  <testsuite name="a second test suite" timestamp="2019-04-18T13:45:21" time="11.735" tests="0" failures="0" errors="0" skipped="0">
    <properties>
      <property name="specId" value="0"/>
      <property name="suiteName" value="a second test suite"/>
      <property name="capabilities" value="chrome"/>
      <property name="file" value=".\test\specs\asuite.spec.js"/>
    </properties>
    <testcase classname="chrome.a_second_test_case" name="a_second_test_suite_a_second_test_case" time="11.706"/>
  </testsuite>
</testsuites>
失败和错误
所有测试用例失败都映射为 JUnit 测试用例错误。由于断言失败或错误导致的失败测试用例将如下所示
<testcase classname="chrome.a_test_case" name="a_test_suite_a_test_case" time="0.372">
  <failure message="Error: some error"/>
    <system-err>
        <![CDATA[
Error: some assertion failure
    at UserContext.<anonymous> (C:\repo\webdriver-example\test\specs/a_test_suite.spec.js:22:17)
]]>
  </system-err>
</testcase>
配置
以下代码显示了默认的 wdio 测试运行器配置。只需将 'junit' 作为报告器添加到数组中即可。为了在测试期间获得一些输出,您可以同时运行WDIO 点报告器和 WDIO JUnit 报告器
// wdio.conf.js
module.exports = {
    // ...
    reporters: [
        'dot',
        ['junit', {
            outputDir: './',
            outputFileFormat: function(options) { // optional
                return `results-${options.cid}.${options.capabilities}.xml`
            }
        }]
    ],
    // ...
};
支持以下选项
outputDir
定义 xml 文件应存储到的目录。
类型:字符串
必需
outputFileFormat
定义测试执行后创建的 xml 文件。
类型:对象
默认值:function (opts) { return `wdio-${this.cid}-${name}-reporter.log` }
outputFileFormat: function (options) {
    return 'mycustomfilename.xml';
}
注意:
options.capabilities是该运行器的功能对象,因此在字符串中指定${options.capabilities}将返回 [Object object]。您必须指定要在文件名中使用的功能属性。
suiteNameFormat
能够提供自定义正则表达式以格式化测试套件名称(例如在输出 xml 中)。
类型:正则表达式,
默认值:/[^a-zA-Z0-9@]+/
// wdio.conf.js
module.exports = {
    // ...
    reporters: [
        'dot',
        ['junit', {
            outputDir: './',
            suiteNameFormat: /[^a-zA-Z0-9@]+/
            outputFileFormat: function(options) { // optional
                return `results-${options.cid}.${options.capabilities}.xml`
            }
        }]
    ],
    // ...
};
addFileAttribute
向每个测试用例添加文件属性。此配置主要用于 CircleCI。此设置提供了更丰富的详细信息,但在其他 CI 平台上可能会出现故障。
类型:布尔值,
默认值:false
packageName
您可以通过设置 'packageName' 将包分解为另一个级别。例如,如果您想遍历具有不同环境变量设置的测试套件
类型:字符串
示例
// wdio.conf.js
module.exports = {
    // ...
    reporters: [
        'dot',
        ['junit', {
            outputDir: './',
            packageName: process.env.USER_ROLE // chrome.41 - administrator
        }]
    ]
    // ...
};
errorOptions
允许在 xml 内设置各种错误通知组合。
给定一个像 expect(true).toBe(false, 'my custom message') 这样的 Jasmine 测试,您将获得此测试错误
{
    matcherName: 'toBe',
    message: 'Expected true to be false, \'my custom message\'.',
    stack: 'Error: Expected true to be false, \'my custom message\'.\n    at UserContext.it (/home/mcelotti/Workspace/WebstormProjects/forcebeatwio/test/marco/prova1.spec.js:3:22)',
    passed: false,
    expected: [ false, 'my custom message' ],
    actual: true
}
因此,您可以选择哪个键将用于哪里,请参见下面的示例。
类型:对象,
默认值:errorOptions: { error: "message" }
示例
// wdio.conf.js
module.exports = {
    // ...
    reporters: [
        'dot',
        ['junit', {
            outputDir: './',
            errorOptions: {
                error: 'message',
                failure: 'message',
                stacktrace: 'stack'
            }
        }]
    ],
    // ...
};
addWorkerLogs
可选参数,将此参数设置为 true 以便在报告器中附加来自测试的控制台日志。
类型:布尔值
默认值:false
示例
// wdio.conf.js
module.exports = {
    // ...
    reporters: [
        'dot',
        ['junit', {
            outputDir: './',
            addWorkerLogs: true
        }]
    ],
    // ...
};
向测试用例添加自定义属性
此插件提供了一个函数 addProperty(name, value)。此函数可用于向当前正在运行的测试步骤添加其他 junit 测试用例属性。这些属性将在结果 xml 中报告为 <property name="${name}" value="${value}" />。
这的典型用例是添加指向问题或测试用例的链接。
用法示例
Mocha 的示例
import { addProperty } from '@wdio/junit-reporter'

describe('Suite', () => {
    it('Case', () => {
        addProperty('test_case', 'TC-1234')
    })
})
Jenkins 设置
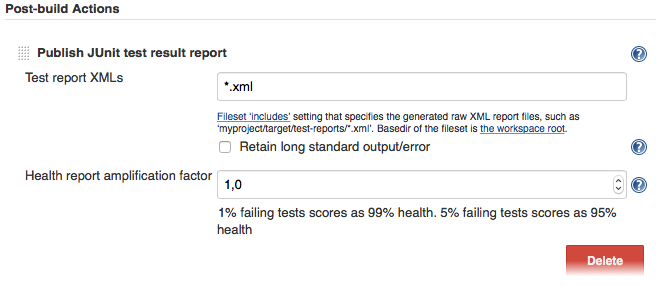
最后但并非最不重要的是,您需要告诉您的 CI 作业(例如 Jenkins)在哪里可以找到 xml 文件。为此,请在测试运行后执行的作业中添加一个构建后操作,并将 Jenkins(或您所需的 CI 系统)指向您的 XML 测试结果

如果您的 CI 系统中没有此类构建后步骤,则可能在互联网上的某个地方有相应的插件。
有关 WebdriverIO 的更多信息,请参见主页。
